MS Word Basics: Outlining and TOC
This might seem like a relatively non-technical topic compared with the other posts on my blog, but I suspect these tips will be useful to somebody! One of my reasons for keeping a blog is to record instructions for processes that I’ve had to explain more than once, and there are a few MS Word tricks which can save you a lot of time.
Images are from Word 2013, but the processes are similar with any version of Word. Click on them to see a larger version.
Use the Built-in Styles
You need to use Header 1, Header 2 etc., when creating titles for your document. These techniques will not work otherwise. If you need more convincing, here’s a thorough post on the subject.
One great thing about the built in styles is that MS Word has shortcuts for them:
Control-Alt-1 applies heading 1, etc. This makes reorganization of your document incredibly easy.
Creating an “Outline Document”
You might want to number the sections of your document to look like an outline. For example:
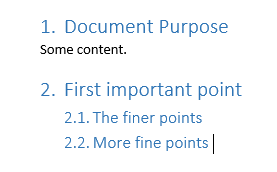
This is most easily done by assigning numbering to your headers, and using them as titles for the sections of your document. This approach also plays well with the Table of Contents, also covered below.
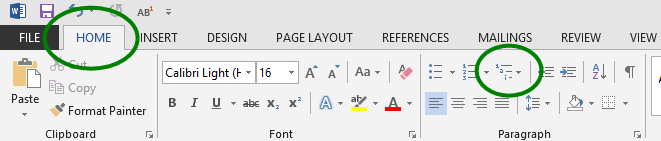
- Click the Multilevel List button on the Home Tab.
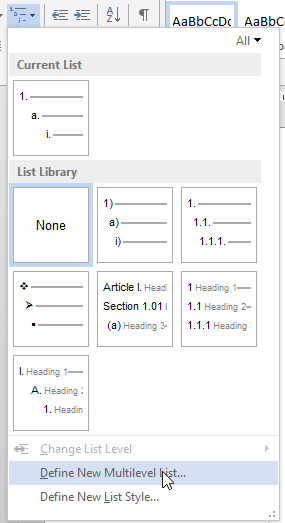
- Here’s a nice trick (optonal): Select the list library which looks most similar to the outline that you want. That will be your starting point. You’ll have to click the Multilevel List button again.
- At the bottom of this dialog, select Define a new Multilevel List
- Click on the More button to see the entire Define new Mutlilevel List dialog
- Let’s say you want a two-level outline.
In the left of the dialog where you see Click level to modify, click on 1. On the right where it says Link level to style, click on Heading 1. Do the same for level 2.
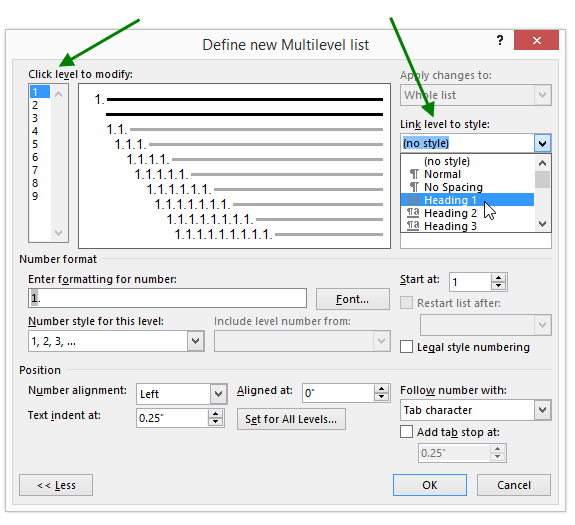
- Click OK. Word will automatically modify the appropriate styles.
Don’t like it? Control-Z will undo the whole thing!
Table of Contents
- First position your cursor at the beginning of the Document, after the title page, or wherever you want your TOC to be.
- You will probably want the table on its own page. This is also important because the table itself takes up room. If so, Control-Enter will give you a page break.
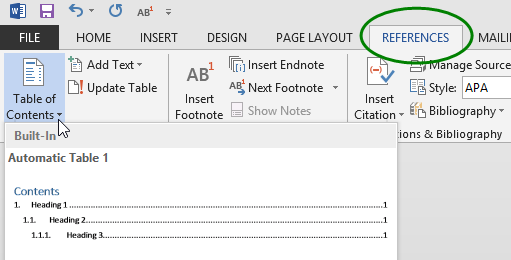
- The trickiest part of this is finding the button – look on the References Tab:
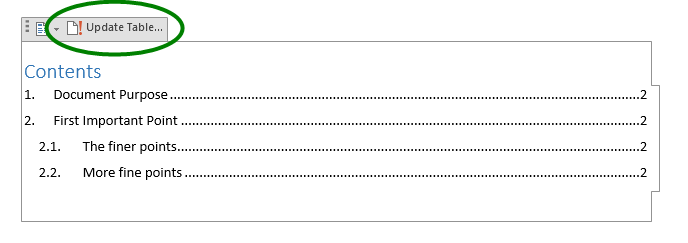
- Once the table is in your document, you will need to tell it when to update. Just click on it and and an Update Table button will pop up in the upper left.
- (Optional) You can also customize your table of contents, applying styles or telling Word how many levels to show. Click the Table of Contents button and select Custom Table of Contents from the dropdown.
Help, I messed up my styles!
Let’s say you’ve changed your header styles and want to go revert to the Word default. Use the following process to locate the Normal Template file, which you can then delete or rename. MS Word will recreate it when restarting. Note that you will lose other custom settings too, like keyboard shortcuts. Fortunately you can always go back, using creative file naming!
- Shut down MS Word.
- Open a file explorer (or “My Computer”) and paste the following into the window at the top: %appdata%\Microsoft\Templates, and hit return.
- Find the file Normal.dotm and rename or delete it.
- Restart MS Word.