Category: Android
Link back to Android app using intent-filter
This post covers a simple scenario where we have a web page (for example, on our organization’s mobile site) that we would like to link back to the mobile app.
In our AndroidManifest.xml, create an intent-filter element as follows:
<intent-filter>
    <data android:scheme="ourorg" />
    <action android:name="android.intent.action.VIEW" />
    <category android:name="android.intent.category.BROWSABLE" />
    <category android:name="android.intent.category.DEFAULT" />
</intent-filter>
If you place this under the main
Now the link ourorg:// will link back to the app.
There’s a lot more that you can do with the intent-filter. For now, we’re just covering a simple case here.
More information on intent-filter on developer.android.com
Signing Your Cordova Android App
So your app is tested, and relatively bug-free – congratulations! Now it’s time to publish on Google Play. You’ll find out pretty quickly that there are a couple of modifications you’ll need to make to your app.
Unfortunately I found that I had to do quite a bit of digging to get my release process *almost* automated. There are full instructions for this here in the Cordova docs, but I’m offering a simpler explanation that will work signing into the automation.
Version Code
You’ll need to change the android:versionCode property in your AndroidManifest.xml file. Google Play will treat your app as a new version every time this value is incremented. If anyone knows how to work this into the Cordova automation, please comment on this post – I would love to hear about it. My current thought is that Cordova Hooks should work for this, but at the moment I’m not going down this path.
<manifest android:hardwareAccelerated="true" android:versionCode="2" android:versionName="1.2" ....
Creating the Key for Signing
First, create a keystore, using the keygen tool. In the following example, I’m generating one for my fictitious client, NCA:
$ keytool -genkey -v -keystore nca.keystore -alias ncamobile -keyalg RSA -keysize 2048 -validity 10000
Enter keystore password:
Re-enter new password:
What is your first and last name?
  [Unknown]:  Michael Mendelson
What is the name of your organizational unit?
  [Unknown]:  NCA
What is the name of your organization?
  [Unknown]:  National Client of America
What is the name of your City or Locality?
  [Unknown]:  San Francisco
What is the name of your State or Province?
  [Unknown]:  CA
What is the two-letter country code for this unit?
  [Unknown]:  US
Is CN=Michael Mendelson, OU=NCA, O=National Client of America, L=San Francisco, ST=CA, C=US correct?
  [no]:  yes

Generating 2,048 bit RSA key pair and self-signed certificate (SHA256withRSA) with a validity of 10,000 days
        for: CN=Michael Mendelson, OU=NCA, O=National Client of America, L=San Francisco, ST=CA, C=US
Enter key password for <ncamobile>
        (RETURN if same as keystore password):
[Storing nca.keystore]
Show the Android Build Scripts Where the Keystore is
When you build in release mode using Cordova, the Android build scripts are invoked. You’ll need to add some properties to a place where the build can see them. If you’d rather not enter the passwords, you’ll be prompted during the build.
Cordova 4.0+
Cordova currently builds with Gradle. When the –release switch is used, Gradle scripts will look for a file called release-signing.properties in platforms/android. Create it, and add the following settings:
storeFile=../../nca.keystore
storeType=jks
keyAlias=ncamobile
keyPassword=passwordhere
storePassword=passwordhere
There are a few other ways to do this. There’s a great StackOverflow reference for that. There’s also more detail here in the Cordova docs
Older Cordova
Properties need to be in a place where Ant can find them. I added them to my platforms/android/local.properties file.
key.store=c:\\dev\\ncamobile\\nca.keystore
key.alias=ncamobile
key.store.password=passwordhere
key.alias.password=passwordhere
Run the Release Build
The following should do it:
cordova build android --release
If you build without the –release argument, the app will still be signed with the Debug Key.
One issue I’d like to overcome is that items in AndroidManifest.xml and local.properties are NOT checked into our code repository, and in fact are regenerated, modified or overwritten by various Cordova processes. While it would make sense that configuration properties like this one would be set-able into the config.xml, that does not appear to be the case. Of course that impedes our ability to just check out the code and run a release build.
I’ll look for ways to smooth out this process in the future, and any insights are welcome.
Use Cordova to Initiate an Email
Since your Cordova app runs in an HTML Layout Engine, there’s a very straight-forward way to initiate an email: a link.
However, if you want to create a nicely formatted email, or a longer one, you need to use a plugin to invoke the native interface. I went with katzer’s cordova-plugin-email-composer, and it works well.
My purpose was to simply create a blank email draft, with only title and content.
The following code wrapper encapsulates the plugin call, taking into account:
- we’re running on a device with email not installed
- we’re running on a non-mobile device (as I often do when debugging the app)
function draftEmail(subject, message) {
    if (!window.plugin){
        //non-mobile - plugins are not present.
        alert("Email plugin is not available");
        return;
    }
    if (!isAvailable){
        //mobile, but no email installed
        alert("Email is not available")
        return;
    }
    window.plugin.email.open({
        to: [], cc: [], bcc: [], attachments: [],
        subject: subject,
        body: message,
        isHtml: true
    });
}

//runs on application startup, to check for installed email
var isAvailable = false;
if (window.plugin){
    window.plugin.email.isServiceAvailable(
        function (emailInstalled) {
            isAvailable = emailInstalled;
        }
    );
}
It would be more elegant to hide the “Share” button if email is not installed on the device, but for demo purposes this works.
Android Notifications using Cordova and Ionic
So you want to add push notifications to your Cordova/Android/Ionic app? I’ll walk through it. Most of this entry applies to Cordova and Android, in case you’ve made the mistake of NOT using Ionic…
Basic Info
Android notifications work through Google GCM (Google Cloud Messaging). You can read the details at http://developer.android.com/google/gcm/index.html, but here’s the summary:

Here’s the narrative version: When your application starts up, the Android device registers with GCM server, which responds with a Registration ID. The device then sends the registration ID to our Message Server, which stores it for future use. Other information, such as the user’s name or location, can be sent for message targeting.
When we want to send out a notification, our Message Server sends the text to the GCM server, along with the registration ID and the API . The GCM server relays info to the device.
The GCM Server
Setting up your Google GCM server should be a fairly quick process. It’s a simple mechanism from our perspective, but does a lot of the heavy lifting for us. Follow these directions to get it running: http://developer.android.com/google/gcm/gs.html. Be sure to make note of your GCM Project ID, and your API Key. The Project ID will go into your Android app configuration, for registration. The API Key is used to send notifications.
The Notification Server
There are any number of ways to do this, and from what I’ve seen, folks often use custom code for this. Of coruse there are some off the shelf products. But for development, I recommend the node-gcm project https://github.com/ToothlessGear/node-gcm. It’s a super-simple way to communicate with the GCM server. First install
npm install node-gcm
Next set up a node script similar to this one:
var gcm = require('node-gcm');
var message = new gcm.Message();

//API Server Key
var sender = new gcm.Sender('INSERT_YOUR_API_SENDER_KEY_HERE');
var registrationIds = [];

// Value the payload data to send...
message.addData('message', "Hello Cordova!");
message.addData('title','Push Notification Sample' );
message.addData('msgcnt','2'); // Shows up in the notification in the status bar
message.addData('soundname','beep.wav'); //Sound to play upon notification receipt - put in the www folder in app
message.collapseKey = 'demo';
message.delayWhileIdle = true; //Default is false
message.timeToLive = 3000;// Duration in seconds to hold in GCM and retry before timing out. Default 4 weeks (2,419,200 seconds) if not specified.

// At least one reg id required
registrationIds.push('THIS_IS_THE_REGISTRATION_ID_THAT_WAS_GENERATED_BY_GCM');

/**
 * Parameters: message-literal, registrationIds-array, No. of retries, callback-function
 */
sender.send(message, registrationIds, 4, function (err, result) {
    console.log(result);
});
The Android App
As you know by now, you need a plugin to do just about anything in Cordova. So install the PushPlugin https://github.com/phonegap-build/PushPlugin. This should be the only plugin you need
for both Android and iOS. You might want to scan the instructions, but (as of now) they are both overly complicated and incomplete. For starters, you don’t need PlugMan to install. Just use:
cordova plugin add https://github.com/phonegap-build/PushPlugin.git
The coding was a little bit tricky, but I finally managed a functional script for Ionic notifications. See inline comments for more information on what’s going on here:
 //factory for processing push notifications.
angular.module('pushnotification', [])
   .factory('PushProcessingService', function() {
        function onDeviceReady() {
            console.info('NOTIFY  Device is ready.  Registering with GCM server');
            //register with google GCM server
            var pushNotification = window.plugins.pushNotification;
            pushNotification.register(gcmSuccessHandler, gcmErrorHandler, {"senderID":gcmAppID,"ecb":"onNotificationGCM"});
        }
        function gcmSuccessHandler(result) {
            console.info('NOTIFY  pushNotification.register succeeded.  Result = '+result)
        }
        function gcmErrorHandler(error) {
            console.error('NOTIFY  '+error);
        }
        return {
            initialize : function () {
                console.info('NOTIFY  initializing');
                document.addEventListener('deviceready', onDeviceReady, false);
            },
            registerID : function (id) {
                //Insert code here to store the user's ID on your notification server.
                //You'll probably have a web service (wrapped in an Angular service of course) set up for this.
                //For example:
                MyService.registerNotificationID(id).then(function(response){
                    if (response.data.Result) {
                        console.info('NOTIFY  Registration succeeded');
                    } else {
                        console.error('NOTIFY  Registration failed');
                    }
                });
            },
            //unregister can be called from a settings area.
            unregister : function () {
                console.info('unregister')
                var push = window.plugins.pushNotification;
                if (push) {
                    push.unregister(function () {
                        console.info('unregister success')
                    });
                }
            }
        }
    });

// ALL GCM notifications come through here.
function onNotificationGCM(e) {
    console.log('EVENT -> RECEIVED:' + e.event + '');
    switch( e.event )
    {
        case 'registered':
            if ( e.regid.length > 0 )
            {
                console.log('REGISTERED with GCM Server -> REGID:' + e.regid + "");

                //call back to web service in Angular.
                //This works for me because in my code I have a factory called
                //      PushProcessingService with method registerID
                var elem = angular.element(document.querySelector('[ng-app]'));
                var injector = elem.injector();
                var myService = injector.get('PushProcessingService');
                myService.registerID(e.regid);
            }
            break;

        case 'message':
            // if this flag is set, this notification happened while we were in the foreground.
            // you might want to play a sound to get the user's attention, throw up a dialog, etc.
            if (e.foreground)
            {
                //we're using the app when a message is received.
                console.log('--INLINE NOTIFICATION--' + '');

                // if the notification contains a soundname, play it.
                //var my_media = new Media("/android_asset/www/"+e.soundname);
                //my_media.play();
                alert(e.payload.message);
            }
            else
            {
                // otherwise we were launched because the user touched a notification in the notification tray.
                if (e.coldstart)
                    console.log('--COLDSTART NOTIFICATION--' + '');
                else
                    console.log('--BACKGROUND NOTIFICATION--' + '');

                // direct user here:
                window.location = "#/tab/featured";
            }

            console.log('MESSAGE -> MSG: ' + e.payload.message + '');
            console.log('MESSAGE: '+ JSON.stringify(e.payload));
            break;

        case 'error':
            console.log('ERROR -> MSG:' + e.msg + '');
            break;

        default:
            console.log('EVENT -> Unknown, an event was received and we do not know what it is');
            break;
    }
}
Call it from here:
app.run(function(PushProcessingService) {
   //run once for the app
   PushProcessingService.initialize();
});
Hopefully this is helpful to someone!
Thanks to these folks (and others) who put together helpful blogs on this topic:
Cordova and AngularJS – Opening links in system browser
In the course of writing my Android/Cordova/Ionic app, I ran into another tricky requirement: Display HTML content from a web service, containing links. These links should open in the user’s preferred browser. In the end, there are several steps necessary to getting this right.
Step 1: Display unescaped HTML in the app.
When AngularJS binds content, special characters are “escaped”, so HTML tags are visible and of course non-functional. Fortunately AngularJS has a fix for this: ng-bind-html. Use this instead of ng-bind (which is equivalent to the double-bracket method). Your content will be slightly sanitized (which will be a problem later), but the links are preserved.
<div ng-bind-html="content.Description"></div>
At this point you’ll see some strange behavior: the links open inside webkit. So the user stays in your app, but there is no way to go back to your Angular HTML5 pages. In my case, even the back button did not work!
As with so many Cordova issues, “there’s a plugin for that.”
Step 2: Install the inappbrowser plugin
Despite its name, the inappbrowser plugin enables the behavior we’re looking for – opening a browser window EXTERNAL to our application. The following command will install it:
cordova plugin add org.apache.cordova.inappbrowserIn theory, all you have to do is set up your links as follows:
window.open('http://intown.biz', '_system', 'location=yes');
Step 3: Apply the “inappbrowser” approach (part 1).
The next question is how to apply this to your downloaded content? Because of AngularJS, there are two issues:
- JavaScript is “sanitized” (i.e. not rendered) by ng-bind-html. Otherwise, we would be able to write a filter to replace our ordinary Anchor tags with tags that invoke the javascript you see above.
- I tried directives, but since I don’t have control over the HTML being passed in, that proved more complicated. Depending on your circumstances, a directive may work for you.
I finally arrived at a two step process. First, use a simple custom filter to add ‘class=”ex-link”‘ to each section where we want the links to open in the external browser.
.filter('externalLinks', function() {
   return function(text) {
     return String(text).replace(/href=/gm, "class=\"ex-link\" href=");
   }
 })
The above filter would need to be more sophisticated if there are classes within the HTML that need to be preserved. Applying the filter in AngularJS, your HTML now looks like this:
<div ng-bind-html="content.Description | externalLinks"></div>
Step 3: Apply the “inappbrowser” approach (part 2).
Finally, we address the question of how to force our links to open in the _system window using JavaScript. For this we’ll resort to JQuery. I generally like to keep JQuery out of my projects, but in my case it was already included for a third-party tool. If anyone knows of a “pure Angular” approach to this, I’m all ears.
Using $timeout ensures that this handler is one of the last applied to the page.
$timeout(function () {
   $('.ex-link').click(function () {
     var url = $(this).attr('href');
     window.open(encodeURI(url), '_system', 'location=yes');
     return false;
   })
})
You might place the above code into the controller of the page that needs it, or in a factory containing utility functions. Don’t forget to inject $timeout in the appropriate place.
This two-step approach has advantages: obviously the “ex-link” class can be added directly to a template’s HTML, allowing you to place an “external link” anywhere in your app, and distinguish from your app’s internal links.
Of course there are some risks to displaying foreign HTML in a Cordova app. For my project, I have been assured that the HTML will be correct, but of course if it’s not, my app could break. So down the road I may add HTML integrity checking, but in the Agile tradition, I will only address this if it’s a real issue.
Changing the Cordova app icon
It seems that many Cordova tasks, even fundamental ones, require some degree of research. In this case, I first found a solution that was “close enough”, and then found a better one. Both are shown here.
The goal here is to use your own custom icon instead of the default icon.
The Sub-optimal Way
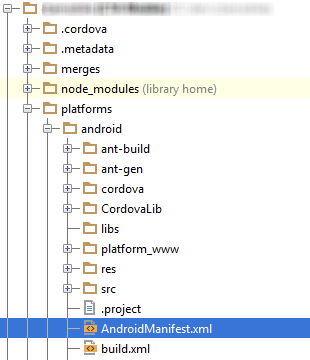
1. Find the drawable directory, and place the icon in it (Yes, I see there are actually 5 drawable directories. For now I only care about one.)

2. Find the AndroidManifest file, and modify it to point to your file. Note: leave out the extension of the icon file.
<application android:hardwareAccelerated=”true” android:icon=”@drawable/myIcon” android:label=”@string/app_name”>
3. Compile and run.
The Better Way
This way is better because as a best practice, it’s good to keep everything in the platforms/android directory generic. Ideally you should be able to check out the code in a clean environment, use the cordova add platform android command and be ready to go.
This time we don’t have to change the manifest, because we’re just replacing the icon.png file by copying over it.
We achieve this using hooks, which are custom commands that run during the build process. This particular command copies the icon files into their appropriate directories. Here’s the process:
- Create a folder for hooks as shown in the image. We’ll focus on the “after_prepare” point of the build, but there are a number of other points where you can run commands, as detailed here.
- Create a configuration directory in the root, as shown. You could really put these files anywhere, if you want to use your own organizational structure.
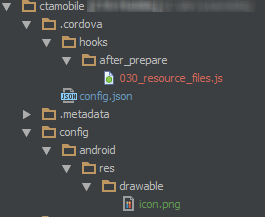
- Download these hooks: http://www.mooreds.com/sample-hooks.tar.gz. You’ll only need the one called 030_resource_files.js, though the others could come in handy too. They are explained by Dan Moore on Devgirl’s excellent blog.
- Tweak the file to suit your own nefarious needs.
Next time you build, your files should be copied into the appropriate places automatically. And you still don’t need to check in your platforms directory!
Running Your Android/Cordova App
Running the app
If this is your first Android/Cordova app, you’re going to find out pretty quickly (like in the first 5 minutes) that you’ll need a place to run it. You have a few options:
On Your Phone
It is easy to run the app on your own Android phone. I’m listing this option first because it is reasonably quick, and quicker than the SDK emulator. First go to Settings, turn on Developer Options and make sure USB Debugging is checked. You can then connect to your development machine with a USB and execute:
cordova run android
Android SDK Emulators/Virtual Devices
The Android SDK comes with a variety of emulators, none of which are initially installed. First run the Android Virtual Devices manager:
android avd
Here you can create one or more Virtual Devices which emulate different phones. Add a new device and configure it. Virtual devices can also be downloaded from smart phone manufacturers, if you want to be specific in your testing. The following command will build and run your app on the virtual device:
cordova emulate android
Of course you can specify which virtual device you want to start up, or use the default.
This emulator is probably the most accurate representation of a phone that you can run, without actually installing on a real one. But it is very slow to start up and run. I found myself looking for an alternative almost immediately.
Just Use the Browser
It quickly occurred to me that because I was writing an HTML/JavaScript app (Cordova) that I could just run it in the browser. So I chose my favorite node.js based lightweight server and was up and running in a few minutes. This worked fine for basic functionality, and of course is very handy for addressing JavaScript issues. This is the world I expect to work in, for most of my app’s functionality, because I’m using Ionic/AngularJS.
However this approach has a few disadvantages: it’s not going to win any awards for appearance – I could not use this method for a client demo or screen shots. And worst of all, it is ONLY for web functionality.
Also, I ran into an issue which didn’t show up here. Of course. It’s not running any of the Cordova scaffolding, so the minute you start changing configuration settings or want to check permissions, you need something more “real”. I expect this method to break if I write custom extensions or need other features that chrome does not offer.
Ripple
I have used Ripple on a limited basis, but it appears to be a nice compromise between the incredibly slow SDK emulator and the “just run in browser” approach.
If you’re new to Ripple, here’s the 30 second low-down: It runs within Chrome, but you start it from the command line. Do NOT install the chrome extension. Just install it from npm as follows:
npm install -g ripple-emulatorYou’ll still need to run in your phone or the SDK emulator, and I suggest doing so whenever you make a change to the configuration or underlying Java. For example, the renaming problem I encountered did not show up in Ripple, though it did in the SDK emulator.
In summary, I expect you’ll be looking at your app using a variety of methods, depending on what you’re testing or need to do. Let me know if I’ve left anything out, and good luck!
AngularJS/Cordova mobile app Dev Setup – Part 2
In AngularJS/Cordova mobile app Dev Setup – Part 1 we got things rolling. We now have node.js, Cordova and associated tools in our environment. Now to apply AngularJS and Ionic.
Part 1 will get you up and running with Cordova, from scratch.
Part 2 adds AngularJS and Ionic to the mix
Part 3 running your app
Ionic is a package of components including AngularJS, custom Angular directives, and some styles which give our HTML5 nice “mobile” look. Out of the box, I found that my app was fairly true to the “iphone look”. Although I’m writing an Android application, this app might eventually be used for iPhone, so this suits me fine.
Ionic
Ionic is very simple to get started. We’re just going to assume that you followed the steps in part 1.
- Install Ionic
-
npm install -g ionic
- Create an Ionic app
ionic start myApp
Now you’re ready to run the sample code. This can be done using Cordova to deploy to the emulator or your phone. This code is also simple enough that you can also run it in a browser!
You can use Express or another lightweight brower to do this, by opening up the www directory [TODO: more detail].
Going the next step
You now have a start on your project, but there are still some tools that you will probably need. I ended up adding these tools shortly after creating it, so here they are:
- Create a package.json file.
- Grunt, a scripting framework for node.js. First you’ll need the command line (installed gloablly), and then install to the project (saving to json file)
npm install -g grunt-cli
npm install grunt --save-dev
- Bower, a packaging manager, similar to npm but intended to manage external tools used in your app, rather than in your dev environment.
npm install -g bower
Many bower packages require you to install git as well (for example, angular-google-maps). When installing for windows, I selected the “add to path” option. This makes it possible to run bower from a standard MS-DOScommand line (you don’t have to use git/bash).
Enjoy Angular
Now it’s time to poke around with Angular and add some functionality. Good luck!
AngularJS/Cordova mobile app Dev Setup – Part 1
The Cordova framework (pretty much synonymous with PhoneGap) puts an HTML5 “wrapper” over the native code (for ios or Android), working toward the goal of write-once-run-anywhere code. Instead of writing in Objective C or Java, most of the code is written in HTML5 and Javascript. I’ve been using AngularJS on a couple of other projects, so naturally I wondered if anyone had applied it to mobile/Cordova/PhoneGap applications. Sure enough I found Ionic, a framework composed of AngularJS, custom Angular directives, and some styles which make things go together nicely.
Part 1 will get you up and running with Cordova, from scratch.
Part 2 adds AngularJS and Ionic to the mix
Part 3 running your app
My first task was to set up my environment. Sure, all the tools were out there, but I spent more time piecing things together than I would have liked. It would have helped me if there had been a Getting Started guide for a first-time mobile developer. So here goes…
I use a Windows 8 machine, so it’s fortunate that I’m designing primarily an Android app. It seems that a Mac is the best choice because you can develop to any mobile platform on it. But I’ll try to keep my development software platform agnostic so that an ios dev could grab the code and use it.
My approach was to get first get Cordova set up and tested, and then apply the AngularJS scaffolding.
Generic Cordova Dev Environment Setup
Install
- node.js – this includes the npm package manager, and is the gateway to a world of open source tools and packages
- Java JDK – don’t laugh, but this was not on my machine yet. Hey, it’s a new Windows 8! Make sure to download the Java Development Kit (JDK). The JRE does not have development tools.
- Apache ANT – A scripitng framework http://ant.apache.org/bindownload.cgi
- Android Developer SDK – Lower-level stuff for Android. http://developer.android.com/sdk/
- Cordova – Now you’ll start using the package manager you installed with node.js. Open up a command line and run:
npm install -g cordova
Settings
Open up your Computer Properties/Advanced System Settings, then click on Environment Variables. Add the following variables (substitute your own for mine):
ANT_HOME = C:\bin\apache-ant-1.9.3
ANDROID_HOME = C:\bin\adt-bundle\sdk
JAVA_HOME = C:\Program Files\Java\jdk1.7.0_51
Then add the following line to the end of the path:
%JAVA_HOME%\bin;%ANT_HOME%\bin;cordo%ANDROID_HOME%\tools;%ANDROID_HOME%\platform-tools
Creating a project
If I haven’t left anything out above (and if you haven’t), you should be ready to use the above tools. If you’re confident and want to go straight to the Angular/Ionic Setup, go for it. Otherwise open a command line and type the following:
> cordova create hello com.example.hello "HelloWorld"
> cd hello
> cordova platform add android
> cordova build
This will create a boilerplate project, a very simple hello world application. The next commands modify the project by adding android support to it, and build it.
A word about IDE’s
The Android Developer SDK comes with the Eclipse editor. This works very nicely for Java, but (because we’ll be using Cordova) we’re going to be working mostly with HTML and Javascript. I chose JetBrains WebStorm, because (despite being a commercial product) it works well for HTML and JavaScript, and extends nicely to AngularJS. Full featured and inexpensive.
Of course I eventually expect the need for a full featured Java editor later in the game. For that I plan to go back to Eclipse.