Changing the Cordova app icon

It seems that many Cordova tasks, even fundamental ones, require some degree of research.  In this case, I first found a solution that was “close enough”, and then found a better one.  Both are shown here.

The goal here is to use your own custom icon instead of the default icon.

The Sub-optimal Way

1. Find the drawable directory, and place the icon in it (Yes, I see there are actually 5 drawable directories.  For now I only care about one.)

drawable directory

2. Find the AndroidManifest file, and modify it to point to your file.  Note: leave out the extension of the icon file.

android manifest

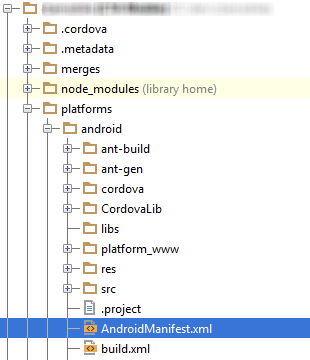
<application android:hardwareAccelerated=”true” android:icon=”@drawable/myIcon” android:label=”@string/app_name”>

3. Compile and run.

The Better Way

This way is better because as a best practice, it’s good to keep everything in the platforms/android directory generic.  Ideally you should be able to check out the code in a clean environment, use the cordova add platform android command and be ready to go.

This time we don’t have to change the manifest, because we’re just replacing the icon.png file by copying over it.

We achieve this using hooks, which are custom commands that run during the build process.  This particular command copies the icon files into their appropriate directories. Here’s the process:

  1. Create a folder for hooks as shown in the image.  We’ll focus on the “after_prepare” point of the build, but there are a number of other points where you can run commands, as detailed here.
  2. Create a configuration directory in the root, as shown. You could really put these files anywhere, if you want to use your own organizational structure.
    cordova resource files
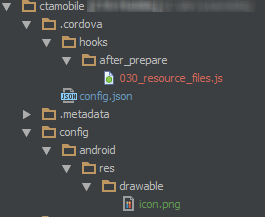
  3. Download these hooks:  http://www.mooreds.com/sample-hooks.tar.gz.  You’ll only need the one called 030_resource_files.js, though the others could come in handy too.  They are explained by Dan Moore on Devgirl’s excellent blog.
  4. Tweak the file to suit your own nefarious needs.

Next time you build, your files should be copied into the appropriate places automatically.  And you still don’t need to check in your platforms directory!

Renaming a Cordova application

As my loyal readers know, I’ve been working on my first Cordova application, focusing on Android.  Of course I found the Android emulator to be very slow, so I worked solely in a browser for a few days.

When I tried installing on my phone (using Cordova run Android), I had a rude surprise – The app crashed on startup, showing a message before any HTML was visible:

Unfortunately, [Insert App Name Here] has stopped.

Thinking back to what I had done that might affect the configuration or interface layer, I eventually remembered that I had changed the name of the application. I had initially accepted project defaults, so undertook a small rebranding effort.

After a bit more digging and testing, I found that everything that could have broken is pretty much auto-generated from Cordova’s config.xml file when Android support is added to the project.  This includes java code bearing your application name, etc.

Rather than pick through that code, I simply removed Android support from the project, and re-added it.  Problem solved:

cordova platform remove android
cordova platform add android

Takehome point: Dev work in the browser is fine, but test any configuration changes on a phone or *real* emulator.

Running Your Android/Cordova App

Running the app

If this is your first Android/Cordova app, you’re going to find out pretty quickly (like in the first 5 minutes) that you’ll need a place to run it. You have a few options:

On Your Phone

It is easy to run the app on your own Android phone.  I’m listing this option first because it is reasonably quick, and quicker than the SDK emulator.   First go to Settings, turn on Developer Options and make sure USB Debugging is checked.    You can then connect to your development machine with a USB and execute:

cordova run android

Android SDK Emulators/Virtual Devices

The Android SDK comes with a variety of emulators, none of which are initially installed.  First run the Android Virtual Devices manager:

android avd

Here you can create one or more Virtual Devices which emulate different phones.  Add a new device and configure it.   Virtual devices can also be downloaded from smart phone manufacturers, if you want to be specific in your testing.  The following command will build and run your app on the virtual device:

cordova emulate android

Of course you can specify which virtual device you want to start up, or use the default.

This emulator is probably the most accurate representation of a phone that you can run, without actually installing on a real one.   But it is very slow to start up and run.  I found myself looking for an alternative almost immediately.

Just Use the Browser

It quickly occurred to me that because I was writing an HTML/JavaScript app (Cordova) that I could just run it in the browser.  So I chose my favorite node.js based lightweight server and was up and running in a few minutes.  This worked fine for basic functionality, and of course is very handy for addressing JavaScript issues.  This is the world I expect to work in, for most of my app’s functionality, because I’m using Ionic/AngularJS.

However this approach has a few disadvantages:  it’s not going to win any awards for appearance – I could not use this method for a client demo or screen shots.   And worst of all, it is ONLY for web functionality.

Also, I ran into an issue which didn’t show up here.  Of course.  It’s not running any of the Cordova scaffolding, so the minute you start changing configuration settings or want to check permissions, you need something more “real”.   I expect this method to break if I write custom extensions or need other features that chrome does not offer.

Ripple

I have used Ripple on a limited basis, but it appears to be a nice compromise between the incredibly slow SDK emulator and the “just run in browser” approach.

If you’re new to Ripple, here’s the 30 second low-down: It runs within Chrome, but you start it from the command line.   Do NOT install the chrome extension.  Just install it from npm as follows:

npm install -g ripple-emulator

You’ll still need to run in your phone or the SDK emulator, and I suggest doing so whenever you make a change to the configuration or underlying Java.  For example, the renaming problem I encountered did not show up in Ripple, though it did in the SDK emulator.

In summary, I expect you’ll be looking at your app using a variety of methods, depending on what you’re testing or need to do.    Let me know if I’ve left anything out, and good luck!

AngularJS/Cordova mobile app Dev Setup – Part 2

In AngularJS/Cordova mobile app Dev Setup – Part 1 we got things rolling.  We now have node.js, Cordova and associated tools in our environment.  Now to apply AngularJS and Ionic.

Part 1 will get you up and running with Cordova, from scratch.
Part 2 adds AngularJS and Ionic to the mix
Part 3 running your app

Ionic is a package of components including AngularJS, custom Angular directives, and some styles which give our HTML5 nice “mobile” look.   Out of the box, I found that my app was fairly true to the “iphone look”. Although I’m writing an Android application, this app might eventually be used for iPhone, so this suits me fine.

Ionic

Ionic is very simple to get started.  We’re just going to assume that you followed the steps in part 1.

  • Install Ionic
  • npm install -g ionic
  • Create an Ionic app
    ionic start myApp

Now you’re ready to run the sample code.   This can be done using Cordova to deploy to the emulator or your phone.  This code is also simple enough that you can also run it in a browser!

You can use Express or another lightweight brower to do this, by opening up the www directory [TODO: more detail].

Going the next step

You now have a start on your project, but there are still some tools that you will probably need.   I ended up adding these tools shortly after creating it, so here they are:

  • Create a package.json file.
  • Grunt, a scripting framework for node.js.  First you’ll need the command line (installed gloablly), and then install to the project (saving to json file)
    npm install -g grunt-cli
    npm install grunt --save-dev
  • Bower, a packaging manager, similar to npm but intended to manage external tools used in your app, rather than in your dev environment.
     npm install -g bower

Many bower packages require you to install git as well (for example, angular-google-maps).  When  installing for windows, I selected the “add to path” option.  This makes it possible to run bower from a standard MS-DOScommand line (you don’t have to use git/bash).

Enjoy Angular

Now it’s time to poke around with Angular and add some functionality.  Good luck!

AngularJS/Cordova mobile app Dev Setup – Part 1

The Cordova framework (pretty much synonymous with PhoneGap) puts an HTML5 “wrapper” over the native code (for ios or Android), working toward the goal of write-once-run-anywhere code.   Instead of writing in Objective C or Java, most of the code is written in HTML5 and Javascript.  I’ve been using AngularJS on a couple of other projects, so naturally I wondered if anyone had applied it to mobile/Cordova/PhoneGap applications.  Sure enough I found Ionic, a framework composed of AngularJS, custom Angular directives, and some styles which make things go together nicely.

Part 1 will get you up and running with Cordova, from scratch.
Part 2 adds AngularJS and Ionic to the mix
Part 3 running your app

My first task was to set up my environment.  Sure, all the tools were out there, but I spent more time piecing things together than I would have liked.  It would have helped me if there had been a Getting Started guide for a first-time mobile developer.   So here goes…

I use a Windows 8 machine, so it’s fortunate that I’m designing primarily an Android app.  It seems that a Mac is the best choice because you can develop to any mobile platform on it.  But I’ll try to keep my development software platform agnostic so that an ios dev could grab the code and use it.

My approach was to get first get Cordova set up and tested, and then apply the AngularJS scaffolding.

Generic Cordova Dev Environment Setup

Install

  • node.js – this includes the npm package manager, and is the gateway to a world of open source tools and packages
  • Java JDK  – don’t laugh, but this was not on my machine yet.  Hey, it’s a new Windows 8!  Make sure to download the Java Development Kit (JDK).  The JRE does not have development tools.
  • Apache ANT – A scripitng framework http://ant.apache.org/bindownload.cgi
  • Android Developer SDK – Lower-level stuff for Android.  http://developer.android.com/sdk/
  • Cordova – Now you’ll start using the package manager you installed with node.js.  Open up a command line and run:
    npm install -g cordova

Settings

Open up your Computer Properties/Advanced System Settings, then click on Environment Variables.  Add the following variables (substitute your own for mine):

ANT_HOME = C:\bin\apache-ant-1.9.3
ANDROID_HOME = C:\bin\adt-bundle\sdk
JAVA_HOME = C:\Program Files\Java\jdk1.7.0_51

Then add the following line to the end of the path:

%JAVA_HOME%\bin;%ANT_HOME%\bin;cordo%ANDROID_HOME%\tools;%ANDROID_HOME%\platform-tools

Creating a project

If I haven’t left anything out above (and if you haven’t), you should be ready to use the above tools.   If you’re confident and want to go straight to the Angular/Ionic Setup, go for it.  Otherwise open a command line and type the following:

> cordova create hello com.example.hello "HelloWorld"
> cd hello
> cordova platform add android
> cordova build

This will create a boilerplate project, a very simple hello world application.  The next commands modify the project by adding android support to it, and build it.

A word about IDE’s

The Android Developer SDK comes with the Eclipse editor.  This works very nicely for Java, but (because we’ll be using Cordova) we’re going to be working mostly with HTML and Javascript.  I chose JetBrains WebStorm, because (despite being a commercial product) it works well for HTML and JavaScript, and extends nicely to AngularJS.  Full featured and inexpensive.

Of course I eventually expect the need for a full featured Java editor later in the game.  For that I plan to go back to Eclipse.

AngularJS Elevator Pitch

When meeting people in DC, the conversation usually turns to “what do you do” within about 5 minutes. Because I’m in a technical field, this usually takes a bit of thought. Depending on whom I’m talking to, I try not to get too technical, but make it sound interesting.  The problem is, the technical part is the interesting part.

Often I find myself describing a technology I’m particularly excited about, AngularJS.

AngularJS has taken me back into the open source world for the first time in quite a while.  I started out with a simple project template, angular-seed.  This provided all of the infrastructure necessary for my first running app, including unit tests.  I added Angular UI Bootstrap for appearance, and angulartics to wrap in Google Analytics seamlessly.  The need for a quick web service prototype brought me to the simple, self-contained world of node.js, and express server.  On the way I’ve increased my git skills, and it seems that I learn a new tool or library every day.

The AngularJS community in DC is very active – perhaps this is typical for up-and-coming technologies, but this one seems to have legs.   There’s tons of on-line guidance for noobs.  A meetup I attended on the topic  was absolutely packed.

My current project has an extremely short fuse – a couple of months from kickoff to production.  Not the ideal agile scenario, but as consultants we can’t always control these things.  The project is neatly broken up – I’m doing the UI, and another developer is handling the database work.  The convenient “collaboration point” is at the web service level.  I was able to determine the interface, and my colleague took it from there.   AngularJS with node.js provided an excellent way to prototype the application quickly, and take us all the way to production.  Because everyone knows what happens to prototypes.

Today I was talking with a guy who had been in IT for years but not a dev, and well into his second (non-IT) career. I told the guy that currently in web development, presentation logic AND non-critical business logic can be implemented on the client side, using powerful Javascript-based frameworks like AngularJS.  Backend functionality is completely controlled through web services.

Sure, I left out all the cool stuff about extensible (and extensive) open source frameworks, writing testable code and all that, but as any web guy knows, you don’t want to lose people by deep-diving.  Then he reminisced about the days of punch cards and waiting all night for programs to compile.  With Angular and node, we’ve now got that compilation time down to zero.

SP2010 “Cannot access local farm” issue

An error I’ve frequently encountered is the “Cannot access local farm” issue.  This can come up when attempting to run a PowerShell script or STSADM command, and looks something like this:

Get-SPWeb : Cannot access the local farm. Verify that the local farm is properly configured, currently available, and that you have the appropriate permission to access the database before trying again.

To work around this, run the following script in the SharePoint Management Shell, as a farm administrator.

Get-SPDatabase | Add-SPShellAdmin domain\username

This will grant the user access to both the configuration database and the content database.

To reverse the above command:

Get-SPDatabase | Remove-SPShellAdmin domain\username

SP2010 Search Primer

Find the Search Administration Console (from central admin)

  1. Select service applications
  2. Select the search service application.

Find and set Crawl Rules

  1. Crawl rules are located here
  2. Crawl Rules can be used to Include or Exclude.  In the following example, there are three rules, used as filters (to exclude):

Force an incremental or full crawl

  1. This can be a bit tricky to find. Select Crawl Sources
  2. There should be only one content source present, unless you have set up others. Click the dropdown next to it – you’ll see options to crawl (which will be grayed out if a crawl is presently running):

SharePoint File Downloader

At Synteractive, our SharePoint deployments often have both custom functionality AND a nice UI. So (in our most interesting projects) we’ll have designers working with developers. As a result, we used to end up with one of the following situations:

  • Developers’ deployed WSP’s overwrite changes in asp, page layouts or master pages.
  • Someone wants to back up all content or styles so it can be used in another project.
  • People tiptoeing VERY CAREFULLY around each other’s code, so as not to overwrite it – but no process in place to prevent that.
  • Some unlucky person gets to copy each file, one by one, from one environment to another.   Ugh.

I started wishing that SOMEONE had created a tool to pull down our customized SharePoint content (e.g. pages, master pages, xsl, css, js) en masse, so that I could reference it later, check it into Subversion or integrate it into a WSP for later deployment to a Production environment.

Introducing SPFileDownloader

Anyone who works with me knows that I love to automate things, and of course I wanted to save time.  So I created a small program which uses SharePoint Web Services to download the contents of lists or folders specified by the user.  It’s a command line utility, but the way it’s written, it could be retooled as Powershell, Windows Forms or whatever.

Since this is a command line utility, various arguments are necessary to tell it where to get the files, authentication information, etc.  If you invoke the program without arguments, you get the following help info:
Usage:
SPFileDownloader <web url> <list | list/folder/subfolder> <target dir local> <username> <password> [switches]
switches:
f   Use form-based authentication
r   Recursive - recurse through subfolders
o   Overwrite - overwrite local files
p   Pause - pause for user input after run

So a typical usage might look something like this:
> SPFileDownloader http://mysite "Style Library" c:\dev\test DOMAIN\username mypassword po

Once you get past this, the usage is self-explanatory. It can handle use form or basic authentication. You can recurse through directories (particularly useful if you want to back up the entire Style Library).

All source code is included here.   A couple of disclaimers: This code is provided as-is!  I won’t support it, though please leave comments if this has been useful to you, or if you have suggestions.   Finally, this code is, um, a bit sloppy.  It started out mostly as snippets compiled from elsewhere.  I’ve spent some time refactoring it, but it doesn’t pay to be perfectionistic here.  It works.

SPFileDownloader source code

Enjoy!

Place the user name anywhere

Everyone loves to see their name on a web page. It’s verification that the user is logged in properly, and perhaps validation of some sort? Well without getting into the psychology of it, I’d like to share a couple of approaches that I’ve taken to further personalize custom SharePoint pages.

The other day I was asked for a “quick script” to display the user’s login name elsewhere on the page. This assumes that you have not removed the login link located at the top right of the page. For this, you need to be using jquery. Thanks to Matt Huber’s blog for this idea, which I’ve taken a step further.

$(document).ready(function(){
     var name = $(".s4-trc-container-menu span a span").text();
     $("#myname").text(name);
});

And place this html wherever you want the name to appear.

<span id="myname"></span>

Similarly, here’s a slightly more sophisticated way to create a custom login link, complete with user name. This is a c# based approach, so the following code can go in the code-behind or inline code – perhaps in the override of OnLoad.

if (HttpContext.Current.User.Identity.IsAuthenticated)
{
    litName.Visible = true;
    //a bit of calisthenics to remove the domain. 
    string[] displayNameComponents = SPContext.Current.Web.CurrentUser.Name.Split(new char[] { '\\' });
    litName.Text = displayNameComponents[displayNameComponents.Length - 1];
}
else
{
    lnkSignIn.Visible = true;
}

Here’s the placeholder for the asp page:

<asp:Literal Visible="false" ID="litName" runat="server"/>
<asp:Hyperlink Visible="false" NavigateUrl="/_layouts/Login.aspx" ID="lnkSignIn" runat="server">Sign In</asp:Hyperlink>

<asp:Hyperlink Visible="true" onclick="STSNavigate2(event,'/_layouts/SignOut.aspx')" ID="lnkSignOut" runat="server">Sign Out</asp:Hyperlink>

That’s all, folks!