Managing AWS Credentials for .NET Developers

When developing .NET apps that use AWS, it’s helpful to know that there are a number of ways to store credentials. These can be used for AWS SDK for .NET calls in your app, or AWS CLI calls on the console. Of course these principles apply to other platforms as well. I’m going to assume that you have everything you need installed, including the AWS CLI.

An aside: In my work as a consultant, I’ve found the need to switch frequently between different sets of credentials. I’ve integrated some of the following methods into a .NET based credential management tool, located on github. This way I can switch my default credential quicky, determine which IAM account corresponds to a credential, and more. Naturally all the source code is out there. Let me know if you find it useful.

There are 4 distinct ways to do this. Some apply to your .NET code only (including Powershell scripts), and others apply only to the AWS CLI.

1. App.config file (see cautionary note)

Applies to: .NET code only
If you’re developing in .NET, you can simply add your Access Key and Secret Key in CLEAR TEXT to your program’s app.config file.

<add key="AWSAccessKey" value="EYNAEYNAEYNAEYNA"/>  
<add key="AWSSecretKey" value="uAWguAWguAWguAWguAWguAWguAWg"/>

Cautionary note: There are circumstances where it’s appropriate to use this method, but be aware that you’re storing your credentials unencrypted. If you should accidentally check your config file into github, your account will be hacked in a matter of minutes. So please be careful.

2. System Properties

Applies to: .NET code and CLI
Another one-credential option is to store credentials in your user settings.

C:\Users\Michael> set AWS_ACCESS_KEY_ID=ABCDEABCDEABCDEABCDE
C:\Users\Michael> set AWS_SECRET_ACCESS_KEY=P08LdGmn9Q/8JT5A9wwCP08LdGmn9Q/8JT5A9wwC
C:\Users\Michael> set AWS_DEFAULT_REGION=us-east-1

IMO this is not preferable – I want to keep clear text credentials out of my settings.

3A. AWS Configure – One set of credentials

Applies to: .NET code and CLI
Use the aws configure command set or editing the credential file it uses to store information, you can manage and use multiple credential sets.

This works well if you have only one set of credentials to deal with, or just want to go with the simplest scenario.

C:\Users\Michael> aws configure
AWS Access Key ID [None]: ABCDEABCDEABCDEABCDE
AWS Secret Access Key [None]: P08LdGmn9Q/8JT5A9wwCP08LdGmn9Q/8JT5A9wwC
Default region name [None]: us-east-1
Default output format [None]: json

3B. AWS Configure – Multiple sets of credentials

Applies to: CLI only
Credentials stored using aws configure are stored a file in your user directory (%USERPROFILE%\.aws\credentials or ~/.aws/credentials). The credential file can store multiple sets, which appear in the file as “named” sections. To manage this, you can either use the aws configure –profile switch, or edit the file directly. Type aws configure help to see what else you can do with this. Note: default is set per the example above.

[default]
aws_access_key_id = ASDFASDFASDFASDFASDF
aws_secret_access_key = P08LdGmn9Q/8JT5A9wwCP08LdGmn9Q/8JT5A9wwC
[client-one]
aws_access_key_id = ABCDEABCDEABCDEABCDE
aws_secret_access_key = P08LdGmn9Q/8JT5A9wwCP08LdGmn9Q/8JT5A9wwC
[client-two]
aws_access_key_id = FGHIJFGHIJFGHIJFGHIJ
aws_secret_access_key = P08LdGmn9Q/8JT5A9wwCP08LdGmn9Q/8JT5A9wwC

NOTE: The best way to delete all of your credentials is to delete the file.

Using a stored profile

Applies to: CLI only
Now that you have aws configure profiles set up, you can tell AWS which one to use, while you’re logged in. Just the appropriate profile using the following command.

set AWS_DEFAULT_PROFILE=client-one

You can also specify the profile in the command. For example, to list all s3 buckets:

aws s3 ls --profile=client-one

4. API-Stored Credentials (for SDK use)

Applies to: .NET code only
The AWSSDK .NET has class Amazon.Util.ProfileManager which can store a named list of credentials. This gives programs like Cloudberry Explorer, and the AWS Visual Studio add-in a common place from which can save and retrieve credentials.

For an example of how to set these, use the c# code that I posted or look at the powershell script included with the AWS SDK for .NET.

These credentials are also stored in a file, which you’ll find at %LOCALAPPDATA%/AWSToolkit/RegisteredAccounts.json. This is similar to the way aws configure stores credentials, but this time they are encrypted!

Note: If one of your credential sets is called “default”, that will be used (and takes precedence over credentials set by AWS Configure).

Using a specific profile in your code

One handy feature is that if you have API stored credentials set, you can specify the default profile to use in the app.config or web.config file of your .NET application. The following configuration is an example:

<configuration>
  <appSettings>
    <add key="AWSProfileName" value="client-one"/>
  </appSettings>
</configuration> 

References:

Validating Start/End dates in AngularJS

In this scenario, the user is prompted for starting/ending dates. Ideally these are validated as the user is filling out the form (rather than on submit). However the co-dependence between different fields makes directive use difficult. I was interested in a simple fix. So sorry, this is not too portable. But it’s simple and works.

I’m using the Angular Bootstrap date picker control.

Note that the way I’ve set this up, it piggybacks on my date validation method. See my separate post about this. If you don’t use this method, you’ll need to choose some other way to make sure both dates are valid before comparing them!

In the controller:

$scope.$watch('model.Template.StartDate', validateDates);
$scope.$watch('model.Template.EndDate', validateDates);

function validateDates() {
    if (!$scope.model) return;
    if ($scope.form.startDate.$error.invalidDate || $scope.form.endDate.$error.invalidDate) {
        $scope.form.startDate.$setValidity("endBeforeStart", true);  //already invalid (per validDate directive)
    } else {
        //depending on whether the user used the date picker or typed it, this will be different (text or date type).  
        //creating a new date object takes care of that.  
        var endDate = new Date($scope.model.Template.EndDate);
        var startDate = new Date($scope.model.Template.StartDate);
        $scope.form.startDate.$setValidity("endBeforeStart", endDate >= startDate);
    }
}
<form name="myForm">
    <input id="startDate" type="text" valid-date datepicker-popup="MM/dd/yyyy" ng-model="model.Template.StartDate" name="startDate" ng-required="true" />

    <input id="endDate" type="text" valid-date datepicker-popup="MM/dd/yyyy" ng-model="model.Template.EndDate" name="endDate" ng-required="true" />

    <span ng-show="form.startDate.$error.endBeforeStart">End date must be on or after start date.</span>

    <span ng-show="form.startDate.$error.invalidDate || form.endDate.$error.invalidDate">Check dates for validity</span>
    <span ng-show="form.startDate.$error.required || form.endDate.$error.required">A required date is missing</span>
</form>

Another thing you might notice is that we (arbitrarily) attach the error to the start date. For this purpose, it doesn’t matter where we put the error, as long as it’s on the form somewhere. You can’t attach an error directly to the form itself, but an error on any field will invalidate the form.

Angular Bootstrap Date Picker validation fix

The Angular Bootstrap date picker is very helpful for UI look/feel. But its validation is inadequate.

  • Javascript is used to determine the date. So I enter 1/1/1, it’s parsed as a valid date even though it’s likely a user error.
  • Any errors (for example, the user enters “xyz”) are not reflected in the control $errors, so the form is still considered valid.

Fortunately, we can solve both of the above problems with a simple directive.

//designed to work with the angular bootstrap date control. 
//sets an error invalidDate when user types the date. 
.directive('validDate', function () {
    return {
        restrict: 'A',
        require: 'ngModel',
        link: function (scope, element, attrs, control) {
            control.$parsers.push(function (viewValue) {
                var newDate = model.$viewValue;
                control.$setValidity("invalidDate", true);  
                if (typeof newDate === "object" || newDate == "") return newDate;  // pass through if we clicked date from popup
                if (!newDate.match(/^\d{1,2}\/\d{1,2}\/((\d{2})|(\d{4}))$/))
                    control.$setValidity("invalidDate", false);
                return viewValue;
            });
        }
    };
})

My HTML looks like this:

<form name="myForm">
     <input valid-date datepicker-popup="MM/dd/yyyy" type="text" ng-model="myStartDate" class="form-control" name="startDate" ng-required="true" />
     <span ng-show="myForm.startDate.$error.invalidDate">Invalid start date.</span>
     <span ng-show="myForm.startDate.$error.required">Start date is required.</span>
</form>

The regex (hard coded into my directive) should match the one in the date picker control, but that is not required. The one I’m using limits the user to slashes / between components. It’s also a bit limited. 99/99/9999 is still a valid value. But you can get as sophisticated as you want here.

Why I like WordPress

Is it surprising that after years of developing and implementing web sites, that I should be singing the praises of WordPress? Not really.

I first noticed WordPress as I was seeking information on a content management system I frequently implement, Microsoft SharePoint.  I noticed that most of the SharePoint bloggers use WordPress.  Of course SharePoint has its own blog features, so why use WP?

As it turns out, there’s much to like.

Super-simple to deploy and host.

Because it’s based in php, deploying and hosting WordPress is really just a matter of copying some files and standing up a MySQL database.

My provider, Dreamhost, (for the grand cost of appx. $10/month), also gives me a simple way to deploy as many instances as I want.  Disclaimer:  I don’t recommend this approach for heavy traffic sites, or if 99.99999% uptime is required, but for the small scale stuff it’s a gift.

Content managers don’t need to get technical

What makes a great content management system?  One of the most important features is that users can add content without being concerned about presentation.  WordPress does this very well.  Once the system is set up, there’s very little that the content manager needs to do – other than add content, of course.

Flexible

Although WP gained its reputation as a blogging platform, it is also an excellent way to put up small scale sites.  It’s easy to structure a site so that that “Pages” make up the site structure, and “Posts” are press releases, technical articles or the like.

Presentation is separated from content

This aspect of WordPress allows you to change the look and feel, or “theme” of the site, without losing content. This is one of the most important differences between WP and old school html driven sites. All content management systems try to separate content from presentation, with varying degrees of success.

Customization

Without going into too much technical detail, WordPress gives a developer a number of ways to customize the platform, and apply those customizations to multiple sites.  The most important mechanism is the Theme, which can contain not only presentation logic (to change the UI or layout of the site), but can also add functionality (such as additional administrator features).

Part of WP’s success in this area stems from how easy it is to change themes (as an admin), customize themes (designer) or create new ones (developer). Compared with a more complex CMS such as SharePoint, there’s no contest.

Taking this a step further, there’s a huge marketplace for WordPress customization.  It’s possible to buy a pretty nice template for $100 or less, although you can spend a lot more for something more sophisticated which includes support.

Easy to Scale

Scaling is the key to creating high traffic sites, and WordPress is usually deployed on the LAMP stack (Linux/Apache/MySQL/Php), which makes it very straightforward to scale.  If you want to create an autoscaling AWS site, here’s an example of how to do that :  you can just follow the guide (some assembly required, but not much).

UPDATE: Amazon continues to add options for creating auto-scaling WordPress systems in AWS, so in the months since I wrote this post, I’ve found even easier ways to achieve this.

Other Misc. Stuff

  • Open Source:  WordPress is an open source project done right.
  • Ubiquitous: Because WordPress in such widespread use, WordPress.org issues updates quickly when issues are found.

That’s all I have to say about this, for now!  Thanks for reading.

Git: Merging changes from one upstream branch into another

Let’s say we have two branches, “Development” and “Testing”, in the upstream repository.    Our developers push their changes to the Development branch.  Periodically during the development cycle, we’ll need to update our Testing branch to bring it in line with the Development branch.

Some of these commands are optional (and are marked as such) – they just make things easier, or demonstrate what’s going on.  Note that we never use the “merge” command, but turns out that “pull” uses merge behind the scenes.

The first thing you’ll need to do is to open a git/bash command line.  And did I mention we’re on Windows?

#SETUP: clone the branch Testing onto your local machine (in a directory called “pfsda-integration”)
git clone https://mycompany.com/DefaultCollection/_git/my-project -b Testing my-project-testing
cd my-project-testing/

#SETUP: for convenience (so you won't have to enter your user name and password every time):
git config credential.helper wincred

#OPTIONAL: You'll see logs dating back to when you created the branch. type q to exit.
git log

#pull all changes present in the Development branch into your local copy of Integration.
git pull . origin/Development

#OPTIONAL: Now you'll see logs from today. type q to exit.
git log

#push local changes to current upstream branch (i.e. Testing)
git push

Using Git with Visual Studio 2013

In this post I’ll outline how to make code changes when using Git with Visual Studio. This applies regardless of where git is hosted (TFS, GitHub or elsewhere).

Git differs from other source control because of its “branch often” philosophy.  Plus the fact that you have a copy of the entire repository on your local machine!  But despite the fact that TFS tries to make the process easy, there’s still a process to follow when doing development.  Best practice dictates that instead of just checking our changes into origin/master (the “upstream repository”), we’ll want to do the following:

  1. Create a local branch
  2. Do your work and commit changes
  3. Merge changes with local master
  4. Push changes to upstream master

Note that in some cases, origin/master will NOT be our upstream repository.  For example, we might be working off a Development branch.  So make adjustments as appropriate when following this guide.

I’m going to assume that you’re already set up with your repository, either through TFS or by using the method outlined in my blog.   Let’s say you’re ready to develop.

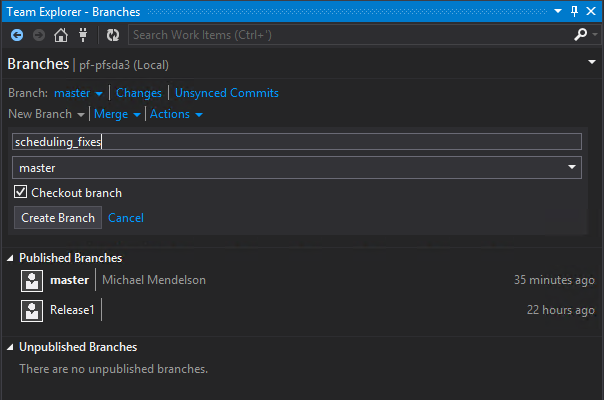
Create a branch

  • At the TFS main menu, click on Branches
  • Click on New Branch and set the name.
  • Click on Create Branch.

git-tfs-2

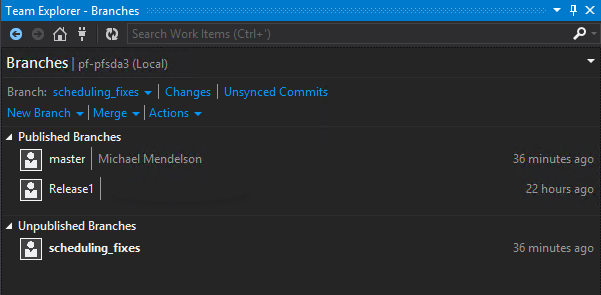
You’ll see your new branch under “Unpublished Branches”.  In TFS, “unpublished” means that the branch exists only locally.  Note that the value of the branch dropdown has been changed.  You are now working on the new branch that you’ve created.

git-tfs-3

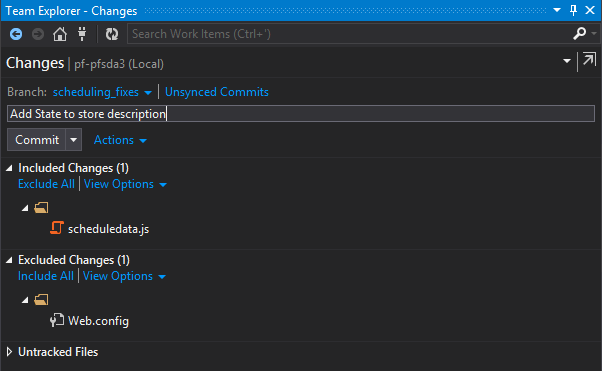
Do your work and commit changes

  • Go to the Changes view.  Your changed items will be listed.
  • Add a comment for your commit (required).
  • Click Commit.  Changes are committed locally.

git-tfs-4

Merge your changes

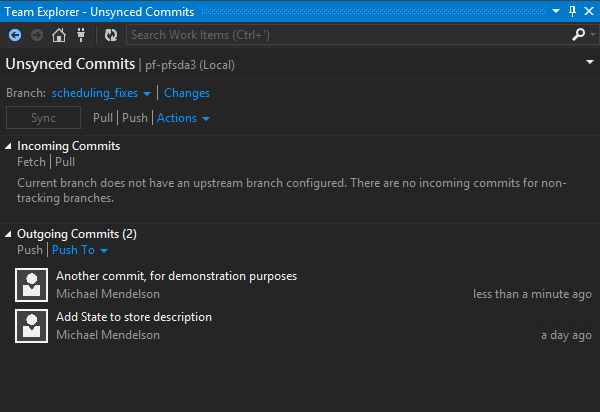
Once you’re done and are ready to contribute your changes to the upstream server, your Unsynced Commits tab might look something like this:

git-tfs-5

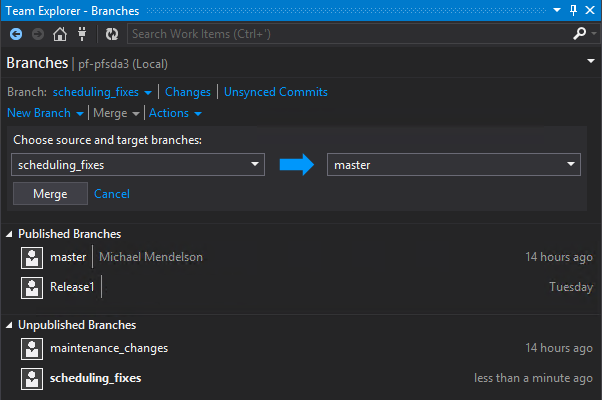
  • In the Merge tab, click on the Merge dropdown.
  • Set it up to merge the changes to your local master.
  • Click Merge.

git-tfs-6

Since this is your LOCAL master, you’re unlikely to have conflicts.  Notice that you’ve been automatically switched to the master branch.  You’re done with your old branch, and it can be deleted if appropriate.

Push your changes

Time to push your changes upstream!  From the Unsynced commits tab, do the following:

  • Click Pull to merge all changes locally.
  • Address any conflicts between our check-ins and the merged ones.
  • Retest the code as necessary.
  • Push again.

Note: The Sync button will both pull and push in a single step.  The problem with this approach is that you don’t have the opportunity to test any merged changes!

If your local repository is in sync with the upstream server, you can simply push without the pull.  But to avoid an error, simply pull first.

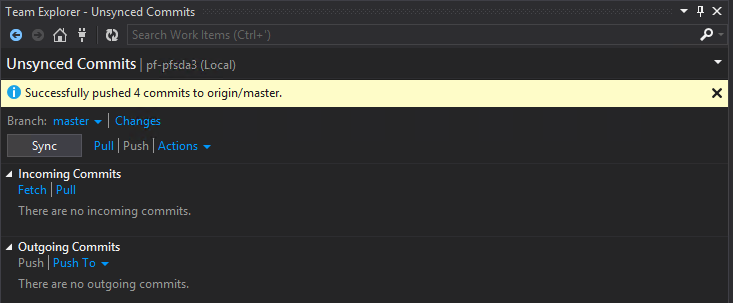
If your push was successful, you’ll get the following:

git-tfs-8

Success!  When I view the history in TFS, my merge looks like this:

git-tfs-9

Related: Getting started with Git/TFS (relates to git hosted on TFS)

Getting started with Git/TFS

I recently moved one of my projects to a TFS Git repository.  But Git did not start out as a Microsoft product, and Git is a relatively recent addition to TFS.   The TFS Visual Studio tools give us some powerful shortcuts, but some things can only be done on the command line.   Here’s how to get the best of both worlds.

Related: Using Git with Team Foundation Server and Visual Studio 2013

Install Git

If you haven’t done so, you’ll need to install Git.  This will allow you to run the command line tools, and (as an added bonus) you’ll get a BASH shell as well.  So if you ever wanted to have a Linux shell on your Windows box, now’s your chance.  IMO it’s good to know Linux, but hey, I’m not here to lecture.

  • Go to http://git-scm.com/download/win
  • There are three options in the install.  They can be a bit involved, but they’re worth reading carefully.  If you’re avoiding the BASH shell, you’ll want to choose the option to make git available in the Widows path.

Set up alternate credentials in TFS

The first thing I found was that my Microsoft Online user name and password don’t work, when attempting to authenticate against git. A bit of research revealed that I had to take an additional step.  

  • Navigate to the git url for your git repository, and log in.  In my case it was something like http://companyname.visualstudio.com/DefaultCollection/_git/rep-name/
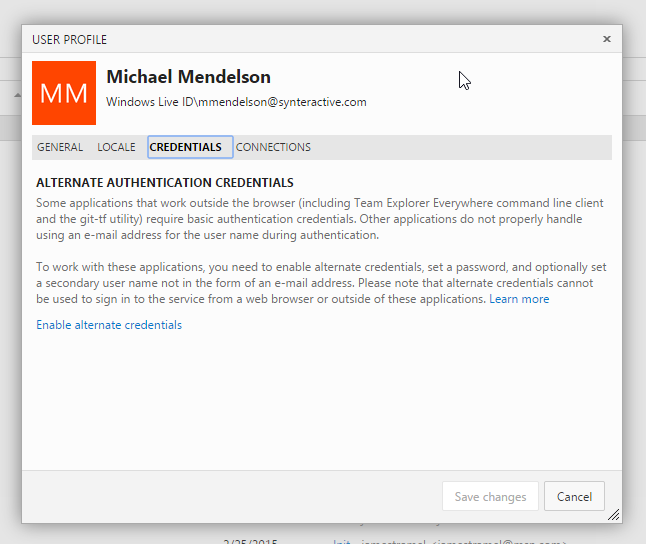
  • Click on your user name -> My profile -> Credentials.   Click on the link at the bottom “Enable alternate credentials”, and create an alternate credential.
    alt creds

Clone your project

With Git, the way to get started with a project is to clone it.  Among other things, this copies the entire repository to your working directory.

  • Go back to the command line and issue the clone command:
    git clone http://companyname.visualstudio.com/DefaultCollection/_git/rep-name/
  • When prompted, use the alternate user name and password that you just set up.

The clone command will replicate the project on your local machine, and you’re good to go.

Most commands (including clone) can be performed directly in Dev Studio, but the command line will be there if you need it.

Jenkins Dropdown

Jenkins with MSBuild

It’s safe to say I’m a huge proponent of Continuous Integration.  I got started with CruiseControl, and moved on to TeamCity a few years ago.  Now, in need of a new system, I’ve set my sights on Jenkins. It’s open source and is in wide use throughout the developer community. I can recommend it to clients without having to talk about possible licensing issues down the road.

There’s a lot that can be done with Continuous Integration, but I’m going to outline some bare-bones goals for this guide:

  • Build the product (a web app), integrating contributions of multiple team members.
  • Notify members of broken builds, so team members can get right on a fix.
  • Run unit tests – a failure is treated as a broken build.
  • Finally, deploy the product to a development site.

We’ll use MSBuild, MSTest, simple email for notification, and deploy to IIS.

Jenkins Initial Setup and Configuration

First, install Jenkins from http://jenkins-ci.org/.  Jenkins is a java-based product, so it runs anywhere.  As a Windows use, I’m going with that install, which includes a compatible JRE.  Jenkins also includes an integrated web server (perhaps based on Tomcat?), and will run on port 8080.  At blog-time, the version was 1.602.

The Windows version installs as a service by default, and includes its own JRE, so you don’t have to worry about Java compatibility issues.

Once it’s installed, go to http://localhost:8080.  The Jenkins front end is rather clunky (maybe someday someone will rewrite it in AngularJS).  It’s configured through a dropdown menu which appears when you hover and click in the exact spot shown:
Jenkins Dropdown

Plugins

It’s good to start with plugins before we hit the overall configuration settings, because we know we’re going to need some of them.

Jenkins is customized through a robust system of plugins, which can be installed from within the app.  Go to Manage Jenkins->Manage Plugins.  The Available tab lists what you can install.  Jenkins comes with some plugins pre-installed.  I recommend updating any plugins listed on the Updates tab.  Once that’s done, you might need the following:

  • MSBuild Plugin – This makes it easier to run MSBuild scripts.
  • MSTestRunner Plugin – It’s easiest to use MSTest if you have Visual Studio installed on the test server.  If not, you can follow these instructions or investigate Visual Studio Agents.

Configuration Settings

Configure Jenkins at Manage Jenkins -> Configure System.  Here are the basics:

  • Jenkins Location
    • Jenkins URL:  This URL will be sent out in notifications.
    • System email address: Will be used as the “from” address for notifications.
  • E-mail Notification
    • Set this up to point to an SMTP server of your choice.   I had pretty good luck using my Gmail SMTP.  You can find instructions for that here.  And here’s the link for two step authentication.
    • The Email-ext plugin is commonly used, for more flexible control over notifications.  Out of the box, Jenkins will send emails if a build fails or is fixed.
  • MSBuild
    • Click on Add MSBuild, and enter the full path of MSBuild.exe, including the executable name. I received an “invalid directory” warning, but this is the only way I could get it to run.  On my machine, MSBuild.exe was at C:\Program Files (x86)\MSBuild\12.0\Bin\msbuild.exe
  • MSTest
    • Similar to MSBuild.  On my dev machine, MSTest was at C:\Program Files (x86)\Microsoft Visual Studio 12.0\Common7\IDE\mstest.exe

Set up Project

Select New Item->Freestyle Project.    Here are the sections you’ll need to pay special attention to:

  • Source Code Management
    • Point to the code repository to monitor.  It might be a good idea to create a code repository user specifically for this purpose, especially since at some point you might be tagging your builds through Jenkins.
  • Build Triggers
    • There is no default value for triggering your build.  For continuous integration the best option is probably to check your code repository every few minutes for changes, and only run the build if necessary.  Select Poll SCM, and enter H/3 * * * * in the box.  The schedule is based on CRON so you can get as complex as you want.
  • Build/Build a Visual Studio Project
    • The simplest way to do this is to point directly to your Solution or Project file.
    • If you like, you can also write your own script to run the build in exactly the way you want.  Here’s an example of a way to use an MS Build script for deployment as well.
  • Build/Run unit tests with MSTest
    • You’ll need to point to the compiled DLL containing your tests, within your workspace.

In any of these sections, you can create multiple configurations.  So it’s possible to monitor multiple code repositories, perform multiple builds, etc.  Quite flexible.

Challenges

Ideally you’ll want to run your CI system on an independent server.  If this is not a full-featured development environment, sometimes rounding up the necessary dependencies can be challenging.  Here is a script that attempts to package all dependencies for SharePoint 2013.

Happy coding!

Waiting indicator using AngularJS interceptors

There are a number of needs that routinely come up when putting together a web UI.   This indicator notifies the user that action is occurring in the background, and goes away automatically when everything is done.
please wait
This happens automatically when your AngularJS app is requesting information via http. This is similar to other code on the web, but is modified it to suit the following needs:

  • Displays wait indicator automatically when http requests are initiated.
  • Tracks the number of requests, and dismisses the indicator when all are resolved.
  • A delay of one second prevents indicator from displaying during angular loading views and quick requests.
  • No jquery (yay)

Here it is on JSFiddle

If you’re looking for code (and you probably are), I recommend taking a look at the JSFiddle link above – it integrates the code, css and html.

We’re using several key AngularJS features here:

Directive

The directive is Angular’s way to hook UI elements to javascript functionality. Much of the logic is located here.

myApp.directive("loadingIndicator", function (loadingCounts, $timeout) {
    return {
        restrict: "A",
        link: function (scope, element, attrs) {
            scope.$on("loading-started", function (e) {
                loadingCounts.enable_count++;
                console.log("displaying indicator " + loadingCounts.enable_count);
                //only show if longer than one sencond
                $timeout(function () {
                    if (loadingCounts.enable_count > loadingCounts.disable_count) {
                        element.css({ "display": "" });
                    }
                }, 1000);
            });
            scope.$on("loading-complete", function (e) {
                loadingCounts.disable_count++;
                console.log("hiding indicator " + loadingCounts.disable_count);
                if (loadingCounts.enable_count == loadingCounts.disable_count) {
                    element.css({ "display": "none" });
                }
            });
        }
    };
});

Interceptors

Allows us to tie into http-related events and run our code at that time. In this case we are hooking into both the request, response and responseError (just in case). Here’s another post on interceptors.

myApp.config(function ($httpProvider) {
    $httpProvider.interceptors.push(function ($q, $rootScope) {
        return {
            'request': function (config) {
                $rootScope.$broadcast('loading-started');
                return config || $q.when(config);
            },
            'response': function (response) {
                $rootScope.$broadcast('loading-complete');
                return response || $q.when(response);
            },
            'responseError': function (rejection) {
                $rootScope.$broadcast('loading-complete');
                return $q.reject(rejection);
            }
        };
    });
});

Broadcast

Broadcast is the way we can fire (and respond to) our own events. As you can see, the interceptor events use $broadcast messages to trigger the logic (located in the directive) to show or hide the indicator.

You can implement this solution from the code on this page, if you include the following:

myApp.factory('loadingCounts', function () {
    return {
        enable_count: 0,
        disable_count: 0
    }
});

See it in action: Here it is on JSFiddle

AngularJS Interceptors for logging service calls

I should start a series of angularJS posts called “stupid angularJS tricks”, because I’m always trying to figure out how to do this or that. Thank goodness for other peoples’ blogs!

In my project, I’m building out a suite of apps which (true to AngularJS form) get their data from services. It’s handy to log all service calls, to make sure caching is working, etc. Ultimately there will be quite a few service calls, so we may want to keep track of them, and it’s certainly handy for debugging.

Prior to my discovery of interceptors, I would write an entry similar to this just before every $http.get or $http.post call, similar to this insanely simplified example:

console.log('WS GET service ' + svcUrl);
$http.get(svcUrl).
  success(function (result, httpstatus, headers) {
  });

Although this does the job, it’s not foolproof – I might forget to include it into future code (resulting in an unlogged call), or worse, I may change my get to a post and the log message would be wrong.

Enter the interceptor.

This lovely mechanism allows us to “intercept” an http call and run our custom code at key points. In this case I want to log something prior to running any $http call. There are various other places I can plug in. It’s all here (search on “interceptor”).

Design your factory for injection

In this case, I’m just plugging into the “request” event, which will fire before the request actually occurs. We receive a configuration object which describes the request, and I fashioned a very crude filter. Why? As I discovered, all requests from angular to include views also come through here. I don’t want those logged – just my web service requests.

myapp.factory('serviceLogger', function () {
    return {
        request: function (config) {
            //weed out loading of views - we just want service requests.
            if (config.url.indexOf('html') == -1) {
                console.log("HTTP " + config.method + " request: " + config.url);
            }
            return config;
        }
    };
});

The interceptor above will do its work prior to the request being made.  There are 4 places where you can use this method to intercept an HTTP request (from the documentation):

  • request: (as above)  Interceptor gets called with http config object. The function is free to modify the config object or create a new one. The function needs to return the config object directly, or a promise containing the config or a new config object.
  • requestError: Interceptor gets called when a previous interceptor threw an error or resolved with a rejection.
  • response: interceptors get called with http response object. The function is free to modify the response object or create a new one. The function needs to return the response object directly, or as a promise containing the response or a new response object.
  • responseError: Interceptor gets called when a previous interceptor threw an error or resolved with a rejection.  Good place for global handling of exceptions thrown in web services!

If you implement requestError or responseError, be sure to return a $q rejection – otherwise the code in your controller will not recognize the error.

Add the functionality to the $httpProvider

Now you’ve got your interceptor – but you still need to make sure your app is using it!   Note that you can only do this in the config section – this is where the $httpProvider is available.

myapp.config(function ($routeProvider, $httpProvider) {
      //you probably have some sort of a routing table here.
      $routeProvider
      .when('/something', { templateUrl: 'views/something.html', controller: 'somethingCtl' })
      .when('/anotherthing', { templateUrl: 'views/anotherthing.html', controller: 'anotherthingCtl' })
      .otherwise({ redirectTo: '/something' });

      //here's where you add your interceptor
      $httpProvider.interceptors.push('serviceLogger');
  })

That’s it!

Be sure to check out all the other stuff that interceptors can do!